


Implementing client-side search in a React app with Fuse.js
Search bars are a common feature offered in React apps, especially when there are tables with large amounts of data displayed. Search functionality can help the user filter data to find the information they’re looking for faster. Some searches require users to submit a form before seeing results, but many users prefer to see a table of data be filtered as they type in the search bar.
React allows developers to use HTML elements, like inputs to build search bars, but they will need to add the search functionality themselves. Because of this, third-party libraries can be useful for developers looking to add this feature quickly.
This post will walk you through a basic implementation of real-time search for a React application using Fuse.js.
Prerequisites for this tutorial
Before diving into the code example, let’s cover what you need to know to follow this tutorial.
First, you should have a solid understanding of JavaScript and how functions work, as well as some familiarity with data structures. Prior experience with React will also be important.
State management is another crucial aspect of modern React syntax. A basic understanding of hooks and state management will be particularly helpful when building applications with Fuse.js, especially when following this tutorial.
It's also recommended to have knowledge of JSX and CSS. Finally, you should have Node.js installed on your machine. You can download the most recent version from the Node.js website.
Understanding Fuse.js
Fuse.js is a powerful JavaScript library that enables fuzzy searching. Fuzzy search helps users find information even if they are unsure about the exact spelling or phrasing of what they are looking for. With Fuse.js, search queries can go beyond exact keyword matching to include approximate matching.
Fuse.js ranks search results based on their relevance to the search query. It uses a scoring system that considers factors like keyword proximity and match length to return results in descending order of relevance.
Fuse.js offers flexibility by working with a range of data sources, including JSON objects, arrays, and plain text files. Search options can also be customized to fine-tune matching behavior, making it a nice choice for more complex scenarios as well.
Additionally it is a lightweight library with no other dependencies.
Now that we know a bit about the search library we’ll be using, let’s dig into building the app.
Building and running the demo locally
We are building a small app with React and Fuse.js to demonstrate real-time search in this article. You can find the final application code in our demo repository on GitHub.
To run the finished application, clone the repo to your local machine and navigate into the root directory of the project. Alternatively, you can follow the tutorial to build this project from scratch
git clone https://github.com/daily-demos/etc-react-fusejs.git
cd etc-react-fusejs
Install the project’s dependencies and start the application as follows:
npm i
npm start
Then the web app should open automatically in your default browser. If it doesn’t, you can navigate to the localhost port shown in your console, which will likely be http://localhost:3000.
Now, let’s go through how to build this demo step-by-step.
Step 1: Setting up the React application
Create a boilerplate React application by running create-react-app:
npx create-react-app my-app
create-react-app.The above command sets up a basic app structure that we can build upon to add our desired search functionality.
Next, navigate into the newly-created application folder and run the app by running the following in your terminal:
cd my-app
npm i && npm start
This will open the application in your browser as shown below:
If the browser window doesn't open automatically, navigate to http://localhost:3000/ to open your new web app.
Step 2: Install Fuse.js
Next, install Fuse.js by running the following in the root of your application directory:
npm install fuse.js
The above command will install the necessary dependencies required to use Fuse.js in your application.
Step 3: Import necessary components
To use the Fuse.js library in our React app, we need to import the necessary components into the App.js file. This file will have been created automatically when you ran create-react-app above. Add the following imports within it:
import Fuse from "fuse.js";
import React, { useState } from "react";
import "./App.css";
The first import above grants us access to the Fuse.js functionality we’ll be using. The useState hook import enables us to easily control application states. Finally, the App.css import contains all the styles related to our application.
Step 4: Define searchable test data and relevant app states
To implement our search functionality, we’ll populate the application with some searchable test data in the form of an array. You can define this within the App.js file.
const initialData = [
  { name: "John Doe", age: 25, email: "johndoe@example.com" },
  { name: "Jane Doe", age: 30, email: "janedoe@example.com" },
  { name: "Bob Smith", age: 35, email: "bobsmith@example.com" },
  { name: "Alice Johnson", age: 40, email: "alicejohnson@example.com" },
];
This is the dataset for our application, which will be used in search queries to generate results. We will also create a simple table with columns for name, age, and email, and fill it with this sample data.
In a production application, this will likely come from a database or some other source as opposed to being hard-coded, but we’re using an array here for illustrative purposes.
Then, in the App() function within the component, define a search result state object:
function App() {
  const [searchResults, setSearchResults] = useState(initialData);
  // ...
}
This state will dictate what is displayed to the user in our application UI. We’re passing in the initial data we defined to begin with, so by default all data will be shown to the user.
Step 5: Configure the Fuse instance
After importing the necessary components and creating some test data, create a Fuse options object and instantiate a Fuse instance in App.js:
function App() {
  // ...
  const options = {
    includeScore: true,
    includeMatches: true,
    threshold: 0.2,
    keys: ["name", "age", "email"],
  }

  const fuse = new Fuse(initialData, options);
  // ...
}
The options object keys above represent the following:
includeScoreis a boolean set totrueto include search result scores in the output.includeMatchesis a boolean set totrueto include the specific pieces of text that matched the search term for each piece of data.thresholdis a float declaring how sensitive the search algorithm is. A threshold of0.0will require a perfect match. You can read more about this in the Fuse.js scoring theory overview.keysis an array of strings that represent which object properties to search for matches. In this case, we’ll just search everything.
Step 6: Handle search text input
To trigger our real-time search functionality, create a handleSearch() function in the App.js file. This will perform the search when text is typed into the input field.
function App() {
  // ...
  const handleSearch = (event) => {
    const { value } = event.target;

    // If the user searched for an empty string,
    // display all data.
    if (value.length === 0) {
      setSearchResults(initialData);
      return;
    }

    const results = fuse.search(value);
    const items = results.map((result) => result.item);
    setSearchResults(items);
  };
  // ...
}
The input text handler above takes an event object as a parameter and uses destructuring to extract the value property from the input element. It then sets the searchTerm state variable to the new value.
Next, we check if the search term is actually an empty string. If so, it means there’s nothing in the search box (the user likely typed something before, and then deleted it), and we set the search results to display all of our initial searchable data.
Otherwise, if the search term is not an empty string, we invoke fuse.search() to query for matches in the dataset.
The search()instance method returns an array of search results, which we map to an array of items using the item property of each match.
If you are wondering why certain results were returned, this might be a good place to log results to the console and examine Fuse’s return object. As per our earlier-defined options, these results will contain the threshold and match values that can help shed light on what matches Fuse found.
Finally, we set the searchResults state variable to the new array of items, using the setSearchResults() function.
Step 7: Create an input field to get the text that the user wants to find
The next step is to create an input field that allows the user to enter their search term. This is created in the return statement in the App component:
    <input
        type="text"
        placeholder="Search by name or email"
        onChange={handleSearch}
      />
Let’s go through the input tag definition above in more detail:
Initially, when the component renders, the input field will be empty. As the user types into the input field, the onChange event is triggered, and the handleSearch() function is called. handleSearch() extracts the value of the input field from the event and performs the search, as we defined above.
Step 8: Create a table to display your search results
Let’s create a table to display search results in App.js:
<table>
  <thead>
    <tr>
      <th>Name</th>
      <th>Age</th>
      <th>Email</th>
    </tr>
  </thead>
  <tbody>
    {searchResults.map((person, index) => (
      <tr key={index}>
        <td>{person.name}</td>
        <td>{person.age}</td>
        <td>{person.email}</td>
      </tr>
    ))}
  </tbody>
</table>
The table definition above includes a header with column names and dynamically generates rows for each item in the searchResults state array. It displays the name, age, and email of each person that matches the user’s search query.
Step 9: Add some custom styling to the app
For the final step, let’s write some CSS to improve the visual appearance of our application. You need to add this code to the App.css file.
  .App {
    font-family: Arial, sans-serif;
    max-width: 800px;
    margin: 0 auto;
    padding: 20px;
  }

  h1 {
    text-align: center;
  }

  input[type="text"] {
    width: 100%;
    padding: 10px;
    font-size: 16px;
    border-radius: 5px;
    border: none;
    margin-bottom: 20px;
    box-shadow: 0px 0px 10px rgba(0, 0, 0, 0.1);
  }

  table {
    width: 100%;
    border-collapse: collapse;
  }

  th,
  td {
    text-align: left;
    padding: 10px;
    border-bottom: 1px solid #ddd;
  }

  th {
    background-color: #f2f2f2;
    font-weight: normal;
  }

  tr: hover {
    background-color: #f5f5f5;
  }
Final output
Now, it’s time to run this app. Go to the project directory and run npm start in your terminal.
Once the app is running, open a web browser and go to http://localhost:3000 to view the output. You should see a table and a search bar as shown below.
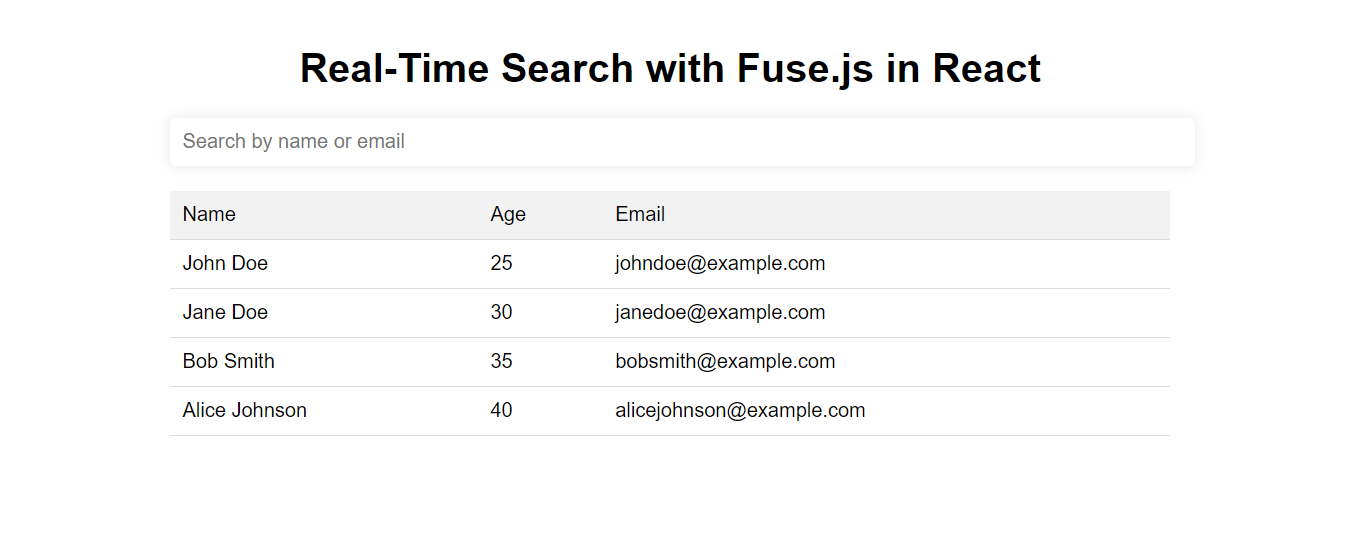
You can enter a search query in the search bar and the table will update in real-time to display only the matching results.
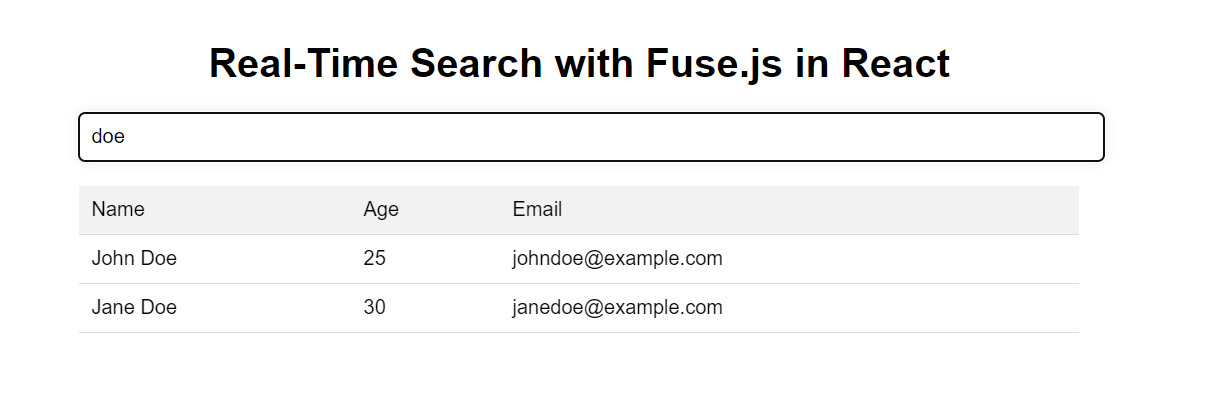
Search Result 01:

Let’s try a different query and see whether the output works fine.
Search Result 02:
Next steps
To ensure the fuzzy search functionality is configured to meet your app’s needs, it's important to test it with a larger dataset. This way, you can experiment with each data point to determine whether the code is working as expected or if it needs further refinement.
By experimenting with the Fuse.js options and optimizing the search functionality, you can ensure that your application provides a high-quality user experience and meets the needs of your users.
Conclusion
Fuse.js is a powerful library that can enable real-time search in a React app, offering a better user experience and improved engagement. By following the steps outlined in this tutorial and experimenting with the various search options, you can create robust search functionality for your app.
Never miss a story
Get the latest direct to your inbox.