Participating in video calls has become such a substantial part of most of our online experiences that it’s common to spend multiple hours attending them every week or month. With that type of time commitment, call participants may find themselves getting distracted or even needing to multitask. Despite it being reasonable to want everyone to focus during a call, sometimes people need to divert their attention, even temporarily.
Developers have various options to help their end users avoid losing track of the video call while consuming other content, such as:
- Using Daily’s picture-in-pip (PiP) setting. (PiP enables participants to have the video pop out of the screen while viewing other windows.)
- Keeping the video call on screen even when a call participant is scrolling through the app’s content. In CSS terms, this is referred to as “sticky” positioning or a “sticky header”.
The latter option (the sticky header) is the one we’ll be focusing on in today’s tutorial.

The sticky positioning solution is commonly seen in apps that include video players. For example, on news websites and social media apps, it’s common to let users scroll without stopping the video they're watching or losing track of it in the UI.

This feature allows the user to keep the video on the page while still being able to consume additional content simultaneously.
Overview
In today’s tutorial, we’ll look at one way to create this sticky header effect in a video call app using only CSS. For the video call itself, we’ll be using Daily Prebuilt, Daily’s video call UI that can be embedded in any web app with just a few lines of code.
We’ll be building a basic web app with HTML, CSS, and plain JavaScript. (You’ll need an introductory understanding of all three to follow along.)
The demo app will show how to make the video stick to the top of the page when the user scrolls down. The code for the sticky header is quite short (two lines of CSS!) so I’ll also include some additional code to show how to shrink the video call UI whenever it sticks to the top of the page. These two features (a sticky header and the reduced video size) are often seen together because users typically want the video to take up less space when they’re looking at other page content.
In case you’re just here for the CSS to create a sticky header for an HTML element, here are the two lines of CSS you’ll need:
.sticky-element {
  position: sticky;
  top: 0;
}
By the end of this tutorial, you’ll have a website built with one HTML, one CSS, and one JavaScript file, which will enable you to:
- Join a Daily room via Daily Prebuilt.
- Scroll through some lorem ipsum Jeffsum text while keeping the video call on the screen.
Transition the size of the video call so it’s smaller when the page is being scrolled, providing more space to read the content below the call.
As is the case for most demo apps, you may want to tweak the implementation a bit to meet your own app’s needs. The idea here is to just show a basic example of what the feature is and how it works.
All sample code shown below is available in GitHub. Feel free to fork the demo repo and play around with it.
Finally, in case you’re wondering, a Daily Prebuilt video call can be scrolled off screen in a web app without any impact on the call. The call won’t end just because you can’t see it after scrolling. Today’s tutorial is more about improving the call experience.
Project setup
If you’d like to test this project locally, you can clone the GitHub repository and move into your local copy with the following terminal commands:
git clone https://github.com/daily-demos/daily-samples-js.git
cd daily-samples-js/samples/daily-prebuilt/sticky-positioning/
To view the website, open the index.html like so:
open ./index.html
Project structure
There are three main files to be aware of in this demo app:
index.html: The app’s UI (user interface).index.js: Client-side JavaScript code to handle events like the document scroll and submitting the HTML form we’ll create below.style.css: Styles for the user interface, including the sticking positioning for the video call.
Creating a Daily room
To use this demo, you will need a public Daily room to join.
- To get a Daily room URL, create a Daily account.
- Once you have an account and are logged into the Daily dashboard, you can create a new Daily room.
- Copy the new room's URL. You will use this value in the app’s join form. Your Daily room URL should be in the following format:
https://<your-daily-domain>.daily.co/<room-name>
Setting up the index.html file
Let’s start by looking at what the rendered homepage should look like to start and the HTML code that represents it.

Most of our app is placeholder text to give the user some content to read while in the video call. The important HTML elements for this tutorial are related to the Daily call:
<!DOCTYPE html>
<html lang="en">
  <head>
    <meta charset="UTF-8" />
    <meta name="viewport" content="width=device-width, initial-scale=1.0" />
    <title>Daily Prebuilt - Sticky positioning example</title>
    /* Include daily-js */
    <script src="https://unpkg.com/@daily-co/daily-js"></script>
    <link rel="stylesheet" href="style.css" />
    <script src="index.js"></script>
  </head>
  <body>
    <main>
      <h1>Daily Prebuilt - Sticky positioning example</h1>

      <h2>Enter a Daily room URL to join a Daily call</h2>
      /* Join form to join your Daily room. */
      <form id="joinForm">
        <label for="url">Room URL</label>
        <input id="url" type="text" />
        <input type="submit" value="Join room" />
      </form>
      /* Container for Daily Prebuilt to be embedded in. */
      <div id="dailyContainer"></div>

      <section>
        /* Placeholder text section */
      </section>
    </main>
    <footer>This is a footer.</footer>
  </body>
</html>
There are three main parts to be aware of in the code block above:
- The files we’re including in the
<head>tag. There’s script tag that includesdaily-js:<script src="https://unpkg.com/@daily-co/daily-js"></script>. This allows us to access Daily’s Client SDK for JavaScript in our project. Below that, there are also theindex.jsandstyle.cssfiles, which are the other local files we’ll be working in. - The
<form>element (our join form). It has one text input for the user to enter their Daily room URL. Note: There is no submit handler on the form yet. We’ll add that inindex.js.

- An empty
<div>element with the ID“dailyContainer”, which is where Daily Prebuilt will be embedded. Thisdivhas the CSS styledisplay:none;applied to it in thestyle.cssfile to start. We will only display it once someone submits the form to join a call.
The rest of this tutorial will focus on the CSS and JavaScript required to apply our sticky header and video call resizing features.
Joining and displaying the video call
As mentioned, the container for the video call is not displayed until the join form is submitted. Let’s start by looking at the form submission process.
In index.js, we can start by adding an event handler for the form’s submit event:
let callFrame = null;

document.addEventListener('DOMContentLoaded', () => {
  const joinForm = document.getElementById('joinForm');
  const callContainer = document.getElementById('dailyContainer');
  // ...

  function createAndJoinCall(e) {
    e.preventDefault();
    // ...
  }

  joinForm.onsubmit = createAndJoinCall;
});
In this code block, callFrame is declared as a global variable. An instance of the Daily call frame class will be assigned to this later on when we join a room.
Once the DOM is loaded, we retrieve the call container div and the join form. These are used to set up the join form’s submit event handler and instantiate the Daily call frame in subsequent code.
Now, let’s look at what happens in the join form’s submit handler, createAndJoinCall():
function createAndJoinCall(e) {
  e.preventDefault();
  const dailyRoomUrl = e.target.url.value;
  callFrame = window.DailyIframe.createFrame(callContainer);
  callFrame.on('left-meeting', handleLeftMeeting);


  // Hide the form and show the call container
  joinForm.style.display = 'none';
  callContainer.style.display = 'block';


  try {
    callFrame.join({
      url: dailyRoomUrl,
      showLeaveButton: true,
    });
  } catch (error) {
    console.error(error);
  }
}
In this function, the first step is to call e.preventDefault(). This will prevent the form submission from triggering a page refresh.
Next, we get the form input value for the Daily room URL:const dailyRoomUrl = e.target.url.value;
Then, we create a new instance of the Daily call frame with the createFrame() factory method and pass the callContainer element as a parameter. This will result in Daily Prebuilt being embedded in the callContainer element.
Once the call is created, we can attach a callback to Daily’s ”left-meeting” event. By doing so, the callback function (handleLeftMeeting()) will be invoked when the local participant leaves the call. (More on this below.)
The are many more Daily events you may want to listen for in your app, but we only need to use ”left-meeting” in this demo.
Next, we update the HTML elements to toggle their display; the join form can be hidden and the call container can be displayed, since we’re about to join the call.
Finally, we can actually join the call using the join() instance method. The Daily room URL we retrieved from the join form is used to indicate which room we’re trying to join, and the showLeaveButton property is enabled to give the local participant a way to leave the call without closing the tab.
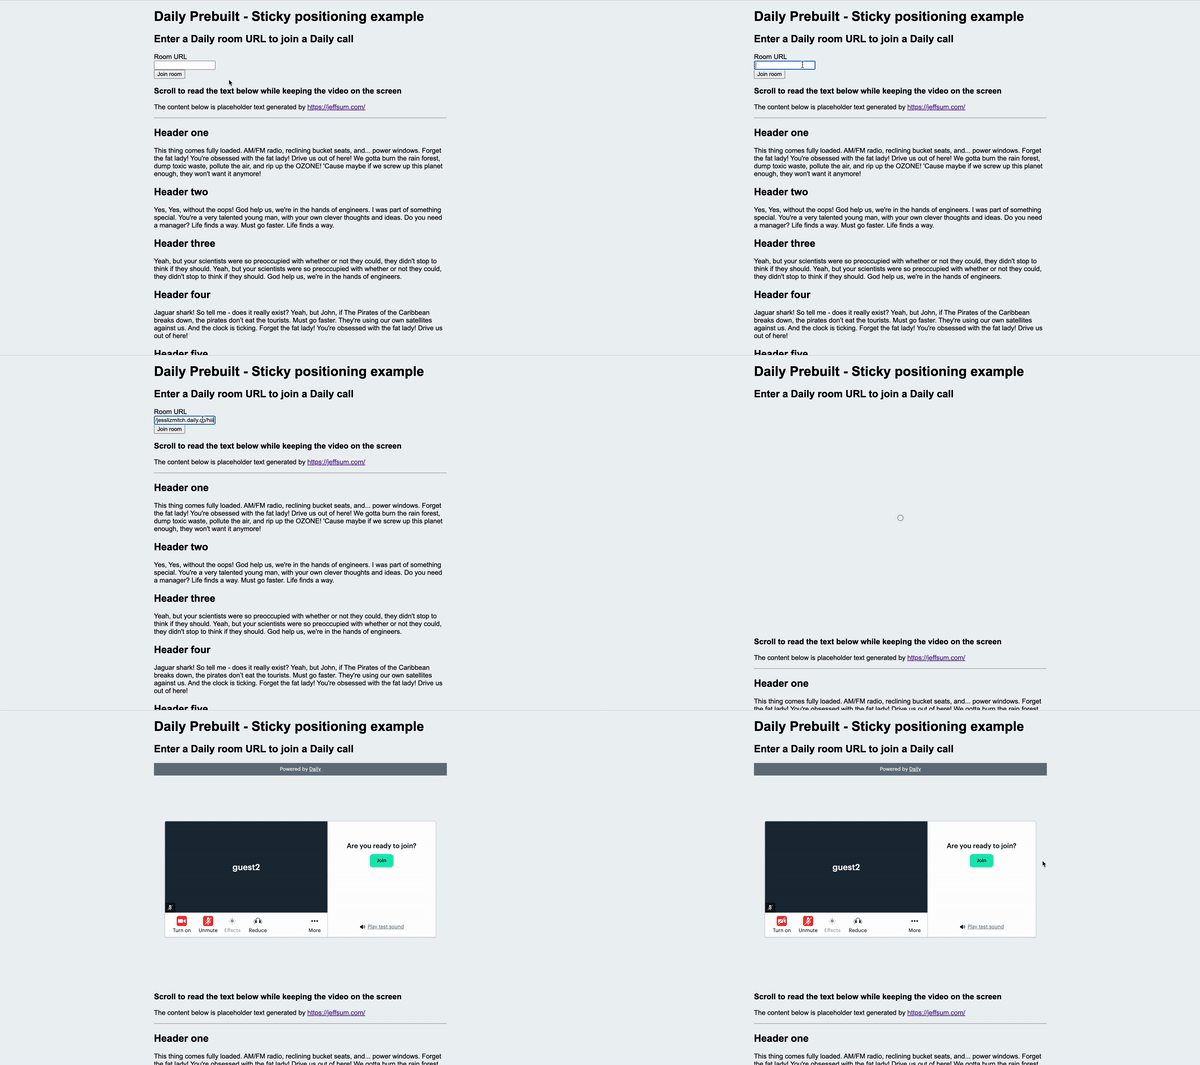
If we test this, our form can now be submitted and will be replaced with Daily Prebuilt, like so:

Let’s also briefly look at handleLeftMeeting():
function handleLeftMeeting() {
  // Show the form and hide the call container
  joinForm.style.display = 'block';
  callContainer.style.display = 'none';
  callFrame.destroy().then(() => {
    callFrame = null;
  });
}
When a call is left by the local participant, we can revert the display of the HTML elements we toggled on join. The join form is displayed again and the call container is hidden. We also reset the callFrame variable after destroying the call frame itself. This resets our app back into its original state.
Creating the sticky header effect for the video call element
As mentioned above, the sticky header effect is created with just two lines of CSS in the style.css file:
#dailyContainer {
  /* sticky header */
  position: sticky;
  top: 0;
  /* end of sticky header*/

  aspect-ratio: 16/12;
  display: none; /* updated to block after joining */
  width: 100%;

  // ...
}
position:sticky; indicates that the element should “stick” when it gets to the value of the top property. top, in this case, is set to 0. This means when #dailyContainer is in a scroll position of 0px or less (i.e., off screen) on the y-axis, it should stay at a scroll position of 0px. Since 0px is at the top of the page, this will cause the element to stick to the top!
The other CSS properties here include the aspect-ratio, which will maintain a 16:12 ratio for the video call element. The width property means it will fill 100% of the available space.
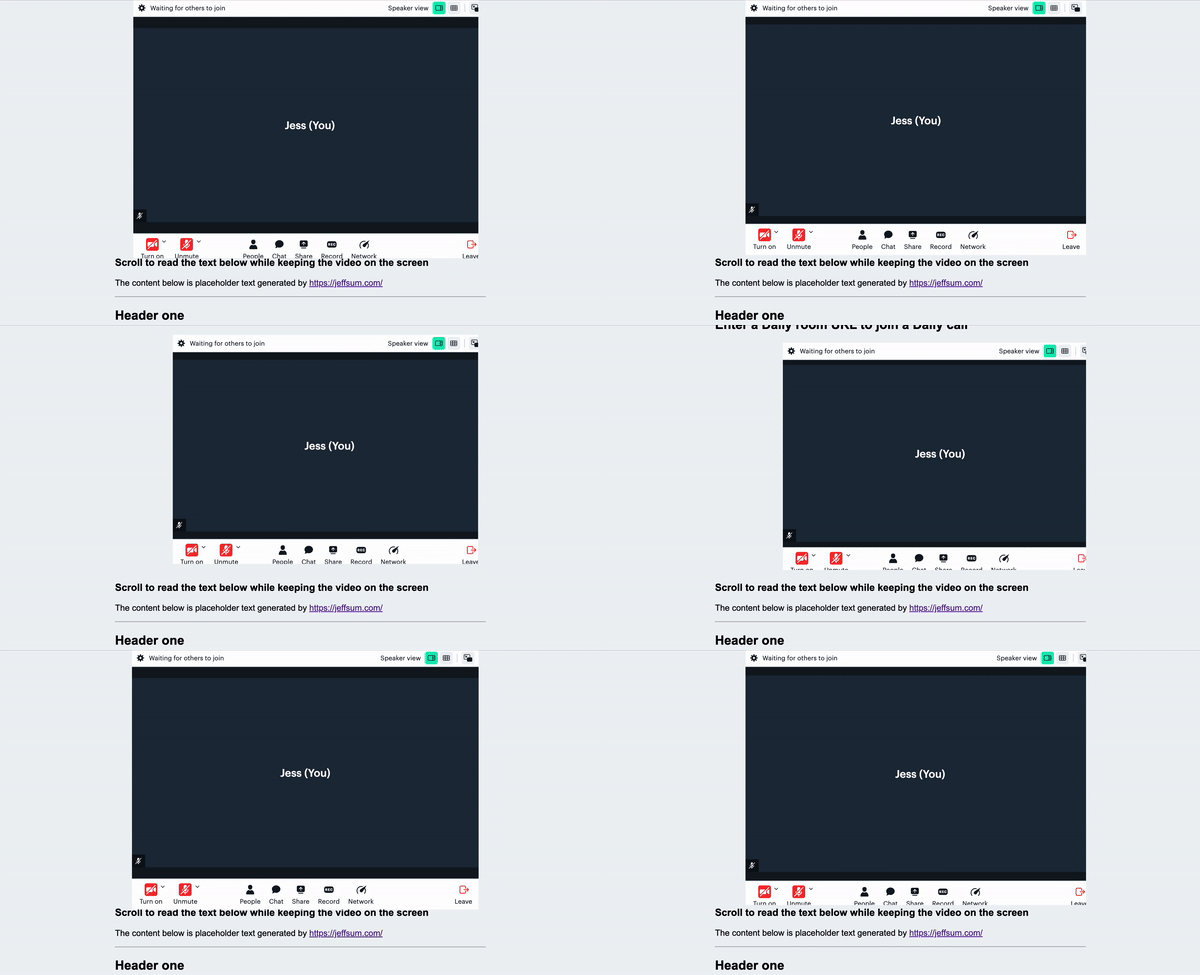
With just these styles, we already have this effect:

The video sticks to the top of the screen on scroll allowing the local participant to view other content on the page without losing sight of the call.
The main issue here is that there isn’t actually much room to read the content below. We can resolve this by shrinking the video call element whenever it is stuck to the top.
Updating the video call element’s size on scroll
To achieve the goal of shrinking the video call element when it’s in its sticky header mode, we’ll need to add code in two spots:
style.css: We’ll add a transition to the call container element’swidthand create a new.scrolledclass to represent the smaller size.index.js: We’ll attach an event handler for the document’s scroll event and add the new.scrolledclass to the call container element when we determine it should be the smaller size.
Starting with the CSS, we can update the #dailyContainer element’s styles:
#dailyContainer {
  position: sticky;
  top: 0;
  aspect-ratio: 16/12;
  display: none; /* updated to block after joining*/
  width: 100%;


  /* new styles to update the width and layout */
  margin-left: auto;
  transition-property: width;
  transition-duration: 0.5s;
}
These three new properties have the following effects:
margin-left:auto;means the element will be pushed to the right whenever there is extra space. In other words, when the element is smaller, the left margin will fill any available space. If the element fills the space (i.e., when thewidthis100%), this declaration won’t have any impact on the layout.transition-propertyindicates that a transition will be applied to thewidthproperty.transition-durationindicates that, when the width transition happens, it should take half a second to complete. This makes the transition smoother than just flipping back and forth between the two sizes.
Next, let’s look at the size we’ll transition to, which is declared under the .scrolled class:
    #dailyContainer.scrolled {
        width: 60%;
    }
This tells us that when the .scrolled class is added to our call container div, the width should transition to 60% of the available space. Since the element already has the aspect ratio set, the height will automatically adjust to accommodate the new width.
Additionally, when this is applied, the margin-left property will have a visible effect on the call container element by pushing the element to the right.
Now that the CSS is ready, let’s look at the JavaScript code we need to apply this .scrolled class on scroll.
Using the document scroll event to update the video call’s width
Let’s start by looking at the JavaScript code relevant to resizing the call container in index.js:
// Add the `scrolled` class when the window is scrolled
function handleScroll() {
  // Scroll-handling logic here, which we’ll cover below
}


document.addEventListener("scroll", throttle(handleScroll, 140));
In this code block:
- We define a
handleScroll()function - We attach the
handleScroll()function to the document’sscrollevent
Since the scroll event is triggered a lot when scrolling – way more often than is needed for this feature to work, which can negatively impact app performance – we will need to throttle how often the handleScroll() callback is invoked.
To do this, we can wrap handleScroll() in a throttle() helper function, which accepts a callback and a number as parameters. (The number represents the number of milliseconds that should be waited in between invoking the callback.) In our case, it will wait 100ms.
document.addEventListener("scroll", throttle(handleScroll, 100));
function throttle(func, timeFrame) {
  var lastTime = 0;
  return function () {
    var now = new Date();
    if (now - lastTime >= timeFrame) {
      func();
      lastTime = now;
    }
  };
}
Let’s now review how handleScroll() determines when to add or remove the .scrolled class to our video container element.
function handleScroll() {
  const callContainer = document.getElementById('dailyContainer');
  const notInCall = window.getComputedStyle(callContainer).display === 'none';
  const { top } = callContainer.getBoundingClientRect(); // 0 (px) when scrolled and at the top of the screen.
  const scrolled = callContainer.classList.contains('scrolled');
  const threshold = 80; // px

  // ...
}
First, we set some variables we’ll need to implement this feature:
- We assign the call container element to a variable:
callContainer. - We determine if the user is even in the call because, if they’re not, we don’t need to worry about the scroll position. We do this by seeing if the call container’s
displayvalue is equal tonone. (Recall: We only display the call container after the join form is submitted.) - Then, we get the
topposition of thecallContainer. When it’s0, we know the document has been scrolled and the call is now at the top of the screen. - We determine if the call container already has the
.scrolledclass. Knowing this will help us determine if we need to add or remove it. - We declare a
thresholdvariable that will represent a limit (in pixels) where the video can move without needing to update it again. This is useful because, when the video call resizes on scroll, it will shift thetopposition a bit. It needs to be able to shift a little without triggering another resize; otherwise, it can end up in a resize loop if it’s scrolled to the coordinate where the resize happens.

Next, we can use these values to determine when to apply the .scrolled class:
function handleScroll() {
  // ...Variables described above

  // Don't apply scroll logic when the local participant isn't in the call.
  if (notInCall) return;
  // Don't update the class list if it's already marked correctly for its placement.
  if ((scrolled && top === 0) || (!scrolled && top > 0)) return;

  // Remove scrolled class if it's scrolled back up.
  if (scrolled && top > threshold) {
    callContainer.classList.remove('scrolled');
  }
  // Add scrolled class otherwise.
  else {
    callContainer.classList.add('scrolled');
  }
}
The following happens in the above block:
- If there isn’t a call displayed, early return. No other action needed.
- If the
.scrolledclass is already applied as needed (i.e., it’s applied because the page is scrolled or excluded because the page isn’t scrolled), early return. Our intended CSS is already applied. - If the call container is marked as scrolled to the top but the top position of the container is greater than our threshold value, we can remove the
.scrolledclass.topwill be equal to0when the video call is pinned to the top of the page, so if it’s more than80(pixels), we can safely say it’s no longer at the top. - In the final case, we can add our
.scrolledclass. The call container isn’t marked as scrolled but we’ve determined it is at the top.
With that, our transition will now work because the .scrolled class will get applied (or removed) on scroll and the call container’s CSS width property will update accordingly.
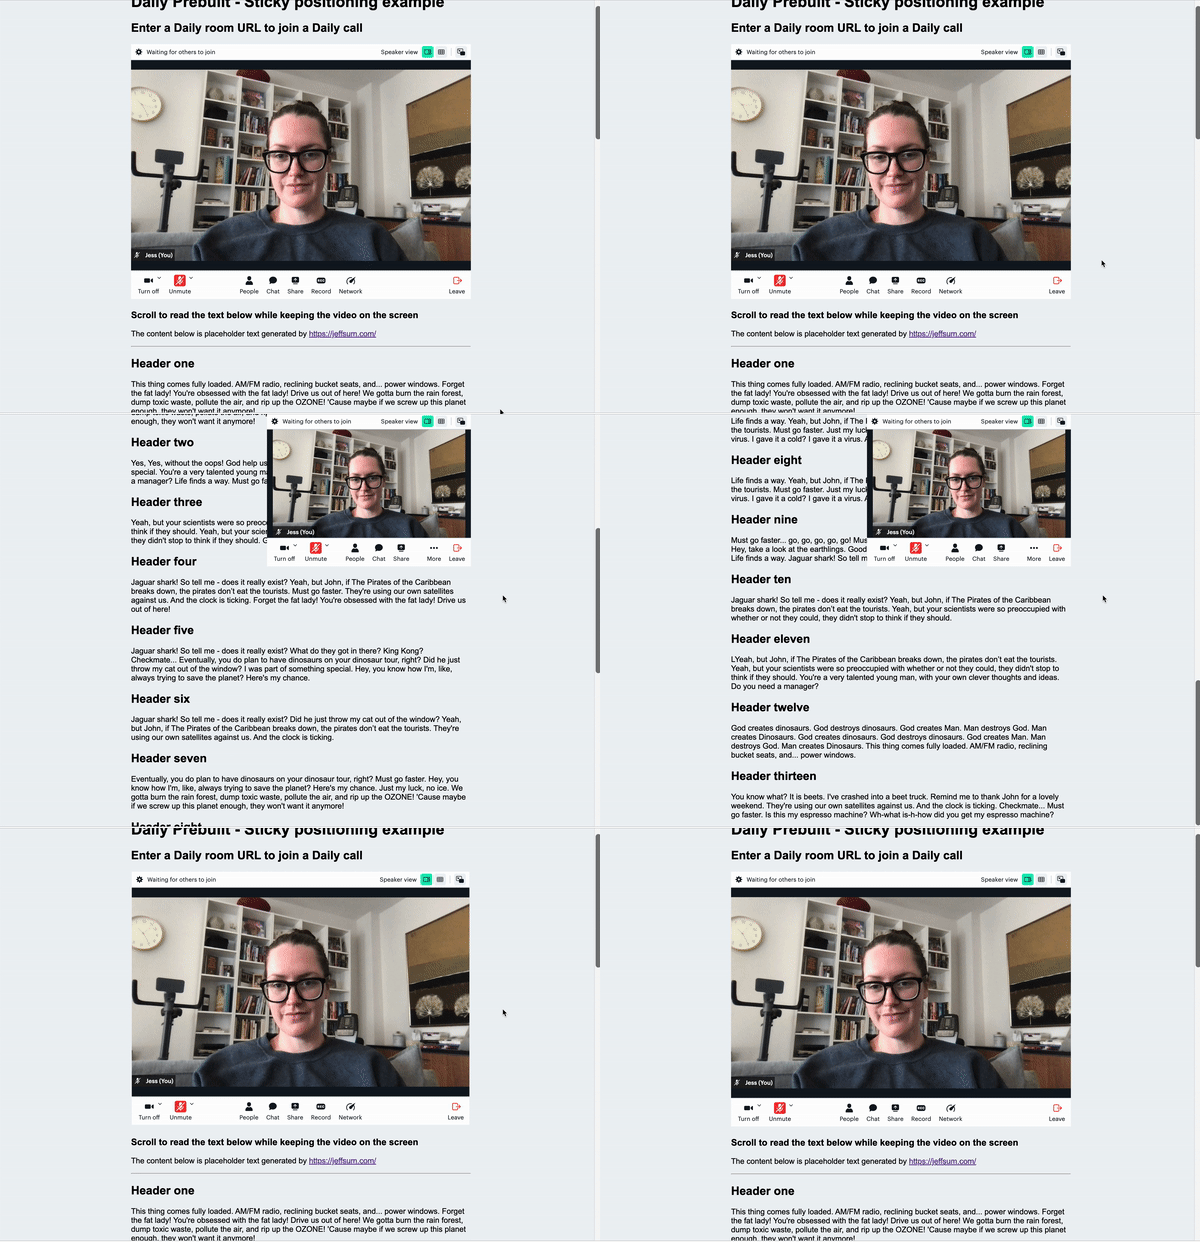
As you can see, scrolling up and down in the areas past the threshold has no impact. It’s only when you cross over the threshold that a transition occurs:

Conclusion
In today’s tutorial, we looked at a couple lines of CSS that can be added to your Daily Prebuilt implementation to make it stay on the screen even when you app users scroll down.
We also looked at how to change the size of the call container when the user scrolls to provide more space to read content below the call.
To learn more about building with Daily Prebuilt, read some of our other tutorials on the Daily blog, as well as our Daily Prebuilt guides.
To see another Daily demo that lets the local participant’s video move for convenience, see our Electron series on building a video call as an overlay, including a video drag-and-drop feature.

